Ever since the demise of my arkOS self-hosted server project, I've been dabbling with some more modern ways of self-hosting the services I care the most about. I run my own email server, personal kanban boards, websites and many other things, but I don't necessarily have the time or the will to invest dozens of hours a year on their upkeep or improvement. However, the introduction of Docker containers, running with Docker Swarm across a failure-tolerant cluster of servers, has been a huge leap forward in my self-hosting quest for simplification and security. This massive project is stable enough now that I can show you how it works - it may be easier than you think to set it up for yourself!
Inspiration
My chief inspiration for this project came from my experimentation with Docker, Docker Swarm, and monitoring technologies that I work on at Savoir-faire Linux. Prior to this, I used three or four virtual private servers with different services manually installed on each. This solution offered no tolerance for failure, no monitoring, no (good) backups, and required a lot of manual intervention and management. So naturally I was eager to implement some of the tricks I learned during my reorganization of some of the hosting at SFL.
Beyond that experience, I used the Funky Penguin's Geek Cookbook which more clearly defined the direction I wanted to go and the exact steps to follow to make everything work properly together. It was especially useful for the configuration of the shared Ceph filesystem and the master node structure!
Why Docker Swarm?
When they are set up to work in a specific manner, Docker containers can be a great way to generalize the application deployments you manage and to ensure that they can be installed and moved around in a modular way. All of the application's code and dependencies live inside the individual Docker containers, and they can talk to other linked containers that will handle the databases, memory caches or other basic needs. In the setup that I use, these containers work together in what is called a stack. A Docker stack setup is essentially the same thing as using docker-compose; the main difference is in how Docker chooses to deploy individual containers in a stack across a Swarm.
A Docker Swarm is a cluster of servers (physical or, in my case, virtual) that are networked together and configured to act as a single unit. The Swarm allows us to add additional servers to improve capacity or processing power for the entire network. This way, applications can be replicated (deployed with one copy per server to act in a load-balancing or failover scenario) or simply scheduled to be deployed to whichever server has the most resources available at a given time. Networking between the servers in the swarm is handled transparently by Docker, so you can have a multi-container application with the main components on one server, the database on another, the Redis cache on a third, and so on. If Docker sees that a server goes offline, whether this is planned or not, it will immediately move the containers from the failing server to the ones that are still active, ensuring a high availability of your services.
The Setup

I am presently hosting three servers on OVH's Public Cloud for all of my infrastructure.
My choice of OVH was based on three factors. First, I needed a dependable server host that used recognized technology. OVH's Public Cloud uses OpenStack technology and is a more dependable solution than their basic VPSes, with more guaranteed resources. Second, I wanted something that wouldn't break the bank — OVH bills in Canadian dollars and is very reasonably priced compared with the competition. Lastly, it's important to me that my data is stored with a non-US company — OVH is based in France and maintains its largest datacenter just south of Montréal (where I live!).
Redundancy
Each of these three servers participates in the Docker Swarm as master nodes. The three nodes together form a quorum of servers - if one of them goes down, one of the other nodes will be elected as leader and will have the responsibility for moving the offline containers to a new host and making sure everything runs smoothly.
They also participate in a shared Ceph filesystem. Ceph allows me to create a filesystem that can span several servers and communicate quickly across a private network. In this way, the data that I add to one server will also be editable from another server, and so on. This is useful for when Docker Swarm redistributes my containers that have bind mounts - as long as these bind mounts are to paths that exist in my Ceph filesystem, they will remain mountable without any intervention from my part after a move to a new server in the swarm. If one of the servers hosting the Ceph filesystem goes offline, the other two servers have access to the replicated data, meaning the swarm should continue to operate without issue.
For backups, I use a combination of containers, bind mounts and cron jobs. Each application that should have data backed up has an additional lightweight container in its stack. This "backup monitor" is essentially an Alpine image with a database client built in that runs a crob job. Every day, the cron job will do a database export to the bind mount, accessible on the parent host (and also in the Ceph filesystem). After this, the parent node will copy the incoming backup files to an offsite storage server.
Monitoring
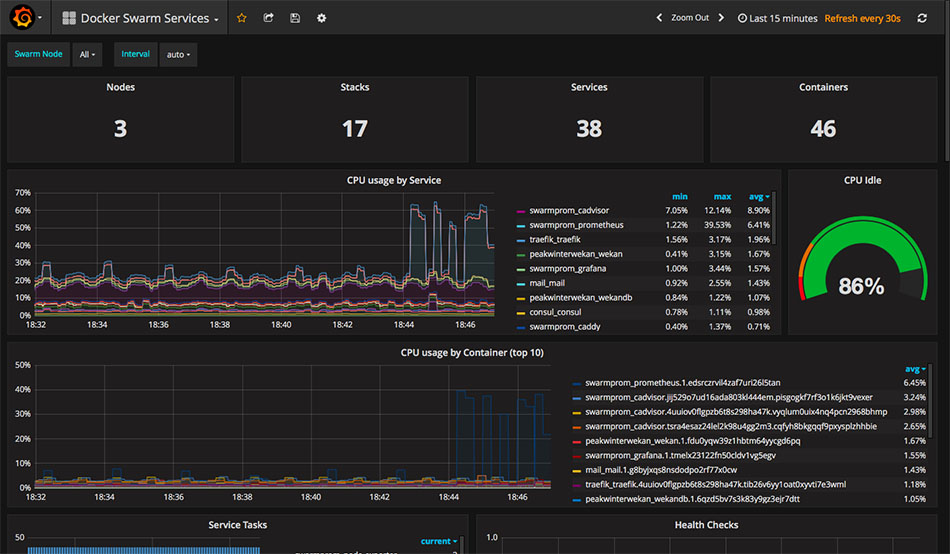
The first stack that I deployed to my swarm is called swarmprom. This is a collection of applications that work together to ensure monitoring and alerts for all nodes and services. Its configuration is written so that monitoring containers will automatically be deployed to each node in a Swarm as it is added. These containers will have access to the Docker daemon of each node, so they can aggregate information about each running container and send it to the Prometheus data store which is also deployed somewhere in the swarm. All of this is hooked up to a ready-made Grafana interface (pictured above), so the CPU, RAM and other metrics of your nodes and containers are all graphed and visible from your web browser. The last component is an Alertmanager service, which can be used to send Slack messages or other kinds of notifications if your Docker swarm encounters issues.
Serving

As I mentioned before, the Docker Swarm transparently handles the networking between containers and services, as well as routes incoming communications from the outside world to the proper destination container. When it comes to accessing these services from the Web, each node is set up to run a Traefik web proxy container. This container will automatically monitor all other services on its respective node, and configure itself to proxy the HTTP requests to and from the appropriate container using filters (by domain name, path, etc). The best part is that it also requests Let's Encrypt TLS certificates as necessary, and stores them in a centrally-managed Consul service which is itself also stored on the Ceph filesystem. Neat!
Summary
With all of these components working in harmony, we can have a system that only requires a docker-compose.yml file to be stored on your server, and a docker stack deploy command to be executed; it will subsequently provide an automatically monitored, backed-up, secured (with TLS), replicated and load-balanced application, tolerant of passing failures and sudden performance spikes.
I've open-sourced the stack configurations that I use with my services, you can find them on my Github page. For many more useful services and a very thorough, technical explanation of the different components of this stack, you can check out Funky Penguin's Geek Cookbook.
Some next steps for my personal cloud include adding more useful services, setting up an ELK (Elasticsearch-Logstash-Kibana) stack for centralized log storage and processing, and much more. If you have questions or any suggestions for improvement, I'd be happy to hear them!